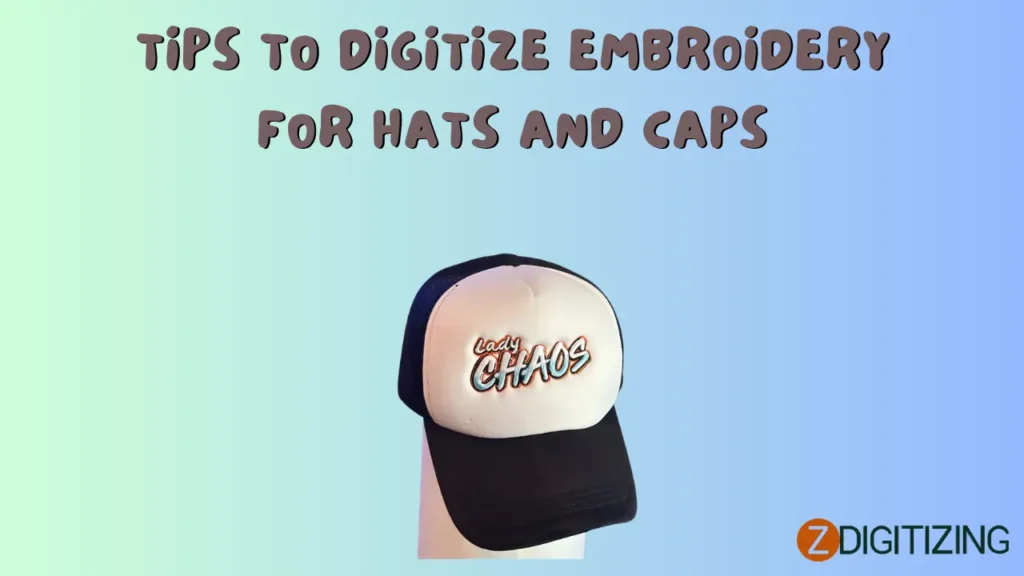
Tips to Digitize Embroidery for Hats and Caps
Embroidery digitizing converts logos, designs, or patterns into digital stitch files (e.g., DST, PES) that embroidery machines use to create professional designs on fabrics, including hats and caps. Embroidering hats and caps presents unique challenges due to their curved surfaces, structured fabrics, and limited stitching areas. Online services like ZDigitizing simplify this process, delivering precise stitch files optimized for headwear. This comprehensive blog shares essential tips to digitize embroidery for hats and caps, ensuring clean, durable, and visually appealing results for branding, fashion, or promotional projects. A concise FAQ section at the end addresses common questions to guide beginners and professionals alike.
Why Digitizing for Hats and Caps is Unique
Hats and caps, such as baseball caps, beanies, or snapbacks, require specialized digitizing to account for their curved surfaces, thick fabrics (e.g., twill, cotton), and small embroidery areas (typically 2-4 inches wide). Proper digitizing ensures logos or designs are clear, secure, and distortion-free, enhancing brand visibility or creative appeal. Online services streamline this process, offering tailored files without the need for costly software or expertise.
Key Tips for Digitizing Embroidery for Hats and Caps
Follow these practical tips to achieve professional embroidery on hats and caps using an online digitizing service:
1. Choose Simple, Bold Artwork
Select designs that translate well to the small, curved surface of hats.
-
Opt for Simplicity: Use bold logos, text, or icons with minimal colors (3-5) and no intricate details or gradients to ensure clarity.
-
High-Resolution Files: Submit artwork in JPG, PNG, or AI formats with at least 300 DPI to avoid pixelation.
-
Size Appropriately: Aim for designs 2-4 inches wide and up to 2.5 inches tall to fit standard cap fronts without distortion.
Why It Works: Simple designs reduce stitch count and maintain legibility on curved surfaces.
Tip: Use tools like Canva or Inkscape to simplify logos, removing fine details before submission.
2. Specify Hat-Specific Requirements
Provide clear instructions to optimize the stitch file for hats and caps.
-
Design Size: Indicate dimensions (e.g., 3 inches wide, 2 inches tall) to fit the cap’s embroidery area, typically the front panel or side.
-
Placement: Specify placement, such as center front, left side, or back arch, to account for curvature.
-
Fabric Type: Note the cap material (e.g., twill, cotton, polyester) for proper stitch density and underlay.
-
File Format: Confirm your machine’s format (e.g., DST for Tajima, PES for Brother) to ensure compatibility.
-
Stitch Type: Request satin stitches for outlines or small text and fill stitches for larger areas to enhance clarity on hats.
Why It Works: Precise specifications ensure the file is tailored for the cap’s structure and material.
Tip: Check your embroidery machine’s manual for hoop sizes and format compatibility before submitting.
3. Use a Cap Frame for Stitching
Ensure your setup is optimized for hats using a cap frame.
-
Cap Frame Compatibility: Use a cap frame attachment for your embroidery machine, designed to hold hats securely and follow their curvature.
-
Proper Hooping: Secure the cap tightly to prevent movement, aligning the design with the front panel or desired placement.
-
Stabilizer Support: Use medium-weight cut-away stabilizer to support structured fabrics and prevent puckering.
Why It Works: Cap frames maintain tension and alignment, ensuring clean stitches on curved surfaces.
Tip: Practice hooping with scrap caps to perfect your technique before stitching final designs.
4. Optimize Stitch Settings for Hats
Work with your digitizing service to adjust settings for flawless stitching.
-
Underlay Stitches: Request underlay stitches to anchor the design, especially on thick or textured fabrics like twill.
-
Stitch Density: Use moderate density (e.g., 0.4-0.5 mm spacing) to avoid thread buildup, which can distort caps.
-
Pull Compensation: Add slight pull compensation (0.1-0.2 mm) to account for fabric stretch and ensure sharp edges.
-
Stitch Direction: Align stitches with the cap’s curvature (e.g., horizontal for front panels) to minimize distortion.
Why It Works: Optimized settings prevent puckering, gaps, or thread breaks on structured headwear.
Tip: Ask your provider, like ZDigitizing, to recommend settings for your specific cap material.
5. Review Digital Previews Carefully
Examine the virtual simulation to catch potential issues before stitching.
-
Check Alignment: Ensure the design fits the cap’s embroidery area without wrapping or distorting.
-
Verify Stitch Quality: Confirm satin stitches for outlines and fill stitches for larger areas are balanced and clear.
-
Request Revisions: Use unlimited revisions to adjust density, colors, or placement for perfect results.
Why It Works: Previews allow you to refine the design, ensuring it translates well to the cap’s surface.
Tip: Save previews to compare with stitched results for consistency across projects.
6. Test on Scrap Caps or Similar Fabrics
Test the digitized file to confirm quality before full production.
-
Use Scrap Caps: Stitch on a similar cap or fabric swatch (e.g., twill or cotton) to check for puckering, thread breaks, or alignment issues.
-
Adjust Machine Settings: Fine-tune tension, speed, or hoop pressure based on test results, consulting your machine’s manual.
-
Check Foam for 3D Puff: If using 3D puff, test foam placement and satin stitch coverage to avoid exposure.
Why It Works: Testing catches errors early, preventing waste and ensuring perfect stitching.
Tip: Keep a log of successful settings for different cap types to streamline future projects.
7. Select High-Quality Threads
Choose threads that enhance durability and vibrancy on hats.
-
Polyester Threads: Use durable, colorfast polyester threads for vibrant, long-lasting logos.
-
Match Brand Colors: Select thread colors that align with your design’s palette for brand consistency.
-
Thread Weight: Use 40-weight threads for most cap designs, balancing durability and detail.
Why It Works: Quality threads ensure vibrant, durable embroidery that withstands wear and washing.
Tip: Work with your digitizing service to match thread colors to your artwork for optimal results.
8. Leverage Professional Support
Use your provider’s expertise to ensure success.
-
Access 24/7 Support: Contact support via email, chat, or phone for help with artwork, settings, or stitching issues.
-
Seek Optimization Tips: Ask for advice on cap-specific techniques, like 3D puff or low-density fills.
-
Learn from Revisions: Use feedback from revisions to improve future hat projects.
Why It Works: Professional guidance ensures files are optimized for hats, reducing errors.
Tip: Build a relationship with your provider, like ZDigitizing, for ongoing support and consistent quality.
Benefits of Digitizing for Hats and Caps
Digitizing for hats and caps offers key advantages:
-
Professional Branding: Precise logos enhance brand visibility on caps for businesses or teams.
-
Durability: Optimized files ensure designs withstand wear, ideal for frequent use.
-
Cost-Effective: Rates of $10-$20 per design, with no software costs, fit tight budgets.
-
Fast Delivery: Files delivered in 2-12 hours support tight deadlines for events or launches.
-
Eco-Friendly: Optimized files minimize thread and fabric waste, aligning with sustainability.
These benefits make digitizing ideal for headwear projects.
Applications of Hat and Cap Embroidery
Digitizing supports a variety of hat and cap projects:
-
Corporate Branding: Embroider logos on baseball caps or beanies for employee uniforms or giveaways.
-
Sports Merchandise: Add team logos or player names to caps for fan gear or team apparel.
-
Promotional Products: Create logoed snapbacks for trade shows, festivals, or marketing campaigns.
-
Fashion Accessories: Design custom patterns or monograms for boutique or streetwear collections.
ZDigitizing’s expertise ensures professional results for these applications.
Overcoming Common Challenges
Digitizing services address typical hurdles for hat embroidery:
-
Curved Surface Distortion: Curvature can warp designs.
-
Solution: Use cap frames and optimize stitch direction for alignment.
-
-
Small Embroidery Area: Limited space reduces design clarity.
-
Solution: Simplify artwork and size designs appropriately (2-4 inches).
-
-
Thick Fabrics: Structured materials like twill require specific settings.
-
Solution: Specify fabric type and use underlay for secure stitches.
-
These solutions ensure clean, professional embroidery on hats.
Technologies Powering Hat Digitizing
Advanced tools enhance digitizing for caps:
-
AI Optimization: Automates stitch mapping and density adjustments for precise, cap-friendly files.
-
Cloud Platforms: Enable secure uploads, real-time previews, and delivery, accessible on mobile or desktop.
-
Encryption: SSL/TLS protocols protect logos and data during transmission.
These technologies ensure efficiency and quality.
Future Trends in Hat Digitizing
Emerging technologies will improve digitizing for hats:
-
Augmented Reality (AR): Preview designs on virtual caps for accurate placement.
-
AI-Driven Optimization: Suggest cap-specific stitch settings for flawless results.
-
IoT Integration: Connect with smart machines for real-time adjustments, streamlining production.
These innovations will make hat digitizing even more effective.
Conclusion
Digitizing embroidery for hats and caps requires careful attention to design simplicity, cap-specific settings, and testing to achieve professional results. By following these tips—choosing bold artwork, using cap frames, optimizing stitches, and leveraging services like ZDigitizing—creators can produce clean, durable, and eye-catching embroidery. With fast delivery (2-12 hours), affordable rates ($10-$20), and eco-friendly practices, digitizing empowers businesses and designers to create standout headwear for branding, sports, or fashion. As AR, AI, and IoT technologies evolve, digitizing for hats will become even more precise and accessible, ensuring perfect stitching every time.
FAQs About Digitizing Embroidery for Hats and Caps
Why is digitizing for hats and caps challenging?
Curved surfaces, thick fabrics, and small embroidery areas require specialized settings for clean stitching.
What artwork works best for hat digitizing?
High-resolution (300 DPI) JPG, PNG, or AI files with simple, bold designs (2-4 inches wide).
What stitch settings ensure clean hat embroidery?
Use satin stitches for outlines, moderate density, underlay, and pull compensation for caps.
How fast are hat digitizing files delivered?
Files are delivered within 2-12 hours, with rush options for urgent projects.
How much does hat digitizing cost?
Rates start at $10-$20 per design, with bulk discounts for multiple logos.
What fabrics are best for hat embroidery?
Structured materials like twill, cotton, or polyester support clean, durable stitches.
How do I avoid distortion on hats?
Use cap frames, simplify designs, and align stitches with the cap’s curvature.
What projects benefit from hat digitizing?
Corporate branding, sports merchandise, promotional products, and fashion accessories.
What technologies support hat digitizing?
AI, cloud platforms, and encryption ensure precise, efficient, and secure workflows.
What’s the future of hat digitizing?
AR previews, AI optimization, and IoT integration will enhance accuracy and speed.