Selecting the right projector screen size is a critical step when planning AV setups for large venues such as auditoriums, conference halls, theaters, and event spaces. The screen size directly impacts audience engagement, visibility, and overall presentation quality. Too small a screen can make content unreadable from the back rows, while too large a screen can distort visuals and overwhelm the space.
In this blog, we will provide a detailed guide on how to select projector screen size for large venues, explain the key factors to consider, and offer practical tips to optimize your setup for maximum impact.
Understanding Projector Screen Size
Projector screen size refers to the width and height of the projected image. In large venues, the screen must be carefully sized to ensure all attendees, regardless of their seating location, can comfortably view content. The screen size is influenced by the throw distance, projector brightness, room dimensions, and viewing angles.
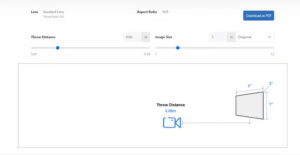
The throw distance is the distance from the projector lens to the screen. Every projector has a throw ratio, which helps determine the optimal screen width:
Screen Width = Throw Distance ÷ Throw Ratio
After determining the screen width, the screen height can be calculated using the projector’s aspect ratio. Most modern projectors use a 16:9 aspect ratio for widescreen content, while some older or specialized projectors use 4:3.
Step 1 Measure the Venue and Throw Distance
Begin by measuring the venue dimensions, particularly the distance from the projector to the screen. In large venues, projectors may be ceiling mounted or positioned at the back of the room. Accurate measurement of throw distance is essential to calculate the appropriate projector screen size and ensure the projected image fits the space without distortion or cutoff.
Step 2 Determine the Projector’s Throw Ratio
The throw ratio is a specification provided by the manufacturer and represents the relationship between throw distance and image width. For example, a throw ratio of 1.8 means the projector needs 1.8 feet of throw distance for every 1 foot of image width. Short throw projectors, often used for smaller rooms, have lower throw ratios, while long throw projectors are better suited for large venues.
Step 3 Calculate the Optimal Screen Width
Using the throw distance and throw ratio, calculate the optimal screen width. For instance, if the projector has a throw ratio of 1.8 and the throw distance is 36 feet:
Screen Width = 36 ÷ 1.8 = 20 feet
This means the projector can display an image 20 feet wide.
Step 4 Calculate Screen Height Using Aspect Ratio
After determining the screen width, calculate the screen height using the projector’s aspect ratio. For a 16:9 screen:
Screen Height = Screen Width × 9 ÷ 16
Screen Height = 20 × 9 ÷ 16 = 11.25 feet
The ideal projector screen size for this setup would be 20 feet wide by 11.25 feet tall.
Step 5 Consider Audience Viewing Distance
In large venues, viewing distance plays a critical role in determining projector screen size. The recommended viewing distance is typically 1.5 to 2.5 times the screen height. For our example with a screen height of 11.25 feet:
-
Minimum Viewing Distance = 11.25 × 1.5 = 16.9 feet
-
Maximum Viewing Distance = 11.25 × 2.5 = 28.1 feet
For venues with multiple rows extending beyond this range, you may need to increase the screen size or consider multiple screens to maintain readability for all attendees.
Step 6 Factor in Ambient Light
Large venues often have varying levels of ambient light from windows, stage lighting, or overhead lights. High brightness projectors (measured in lumens) are essential for maintaining image clarity and contrast in these conditions. In some cases, using blackout curtains or dimmable lighting can enhance visibility and allow for a slightly smaller screen without compromising quality.
Step 7 Consider Content Type
The type of content presented impacts the optimal projector screen size. Detailed charts, graphs, and text heavy slides require larger screens for readability, while video content benefits from immersive, wide screens. If the venue hosts multiple types of events, choose a screen size that balances the needs of all content types.
Step 8 Optimize Projector Placement
Correct projector placement ensures maximum image quality. Center the projector with the screen and maintain proper alignment to avoid keystone distortion. Many projectors offer lens shift and zoom features, allowing fine adjustments to the image without moving the projector. These features are particularly useful in large venues with high ceilings or unconventional layouts.
Step 9 Select the Right Screen Material
The screen material affects brightness, contrast, and viewing angles. For large venues:
-
Matte white screens offer uniform color and wide viewing angles, suitable for most presentations.
-
High gain screens reflect more light and are useful in brightly lit environments, though they can reduce viewing angles.
Choosing the right material ensures that every audience member, from front row to back, sees clear and vibrant visuals.
Video Wall vs Projector Context
While video walls provide high brightness, modularity, and permanent large displays, projectors remain a flexible solution for large venues. Projectors can adapt to multiple setups, support various screen sizes, and allow temporary installations for special events. Understanding projector screen size ensures that a projector setup can provide a viewing experience comparable to that of a video wall while maintaining versatility.
Practical Tips for Optimizing Projector Screen Size
-
Use Manufacturer Tools – Many projector brands provide online calculators to determine the optimal screen size based on throw distance and model specifications.
-
Plan for Multiple Rows – Ensure that the back rows can comfortably view content by adjusting screen height or considering dual screen setups.
-
Test Before Final Installation – Project a test image to verify screen size, brightness, and clarity before permanently mounting the projector or screen.
-
Factor in Ceiling Height – High ceilings may require specialized mounts or larger screens to ensure the image is visible from all angles.
-
Account for Future Flexibility – Consider future upgrades, events, or room layout changes when selecting a screen size to maximize long term usability.
Conclusion
Selecting the right projector screen size for large venues is a balance of throw distance, throw ratio, room dimensions, audience layout, and content requirements. Proper planning ensures that every attendee enjoys a clear and immersive viewing experience, whether the venue hosts presentations, live events, or conferences.
Professional AV solutions like XTEN-AV can assist in accurately measuring your venue, selecting the right projector, and determining the ideal projector screen size. By optimizing your setup, you can deliver presentations that are visually engaging, professional, and impactful for every member of your audience.
Read more: https://ezinearticle.org/how-to-optimize-projector-screen-size-for-presentations-142913.html