Sign Company London UK
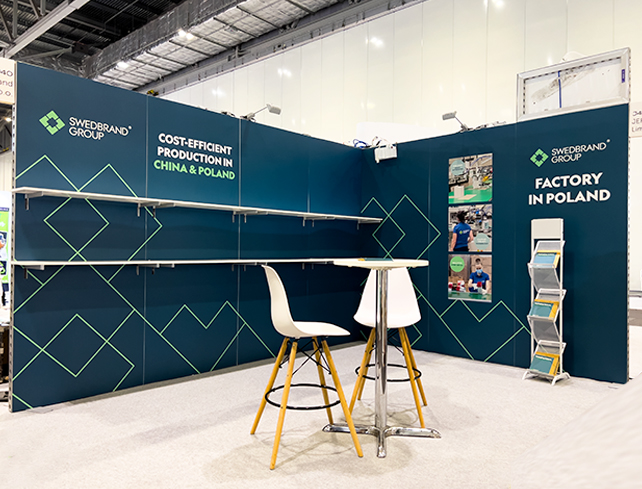
Trade shows and exhibitions are effective ways for companies to communicate with potential customers, build their brand, and display their goods and services. But one detail often overlooked can cause major headaches and unexpected costs graphic panel sizing in shell scheme stands.
Getting your shell scheme graphics wrong could lead to panels that don’t fit, content that gets cut off, and an unprofessional appearance that weakens your brand image. This blog will guide you through the essentials of panel sizing and help you avoid costly mistakes when designing your exhibition space.
What Is a Shell Scheme Stand?
A shell scheme is one of the most popular forms of show booths provided by event organisers. It’s a modular system made up of aluminium poles and infill panels. These stands come in standard sizes and are often arranged in rows to form aisles within a larger exhibition hall.
Typically, shell schemes include:
- Vertical aluminium poles (usually every 1 metre)
- Infill panels (commonly made of Foamex or similar materials)
- Fascia boards (displaying the company name)
While they’re cost-effective and easy to set up, shell schemes can limit creative freedom. That’s why smart planning and precise shell scheme graphics are essential if you want to make a strong visual impact within these constraints.
The True Cost of Getting It Wrong
You might think that a small mistake in size or design won’t make much difference. But when it comes to shell scheme panels, even a few millimetres can cause big problems.
Here’s what can go wrong:
- Misaligned graphics: If the artwork doesn’t account for panel joins or vertical poles, your images or messages may get split in awkward places.
- Wasted money: Printing graphics that don’t fit means paying for a reprint, not to mention the rush charges if you’re short on time.
- Unprofessional appearance: Poorly fitting graphics make your stand look sloppy and unfinished.
- Lost opportunities: A confusing or messy display can turn visitors away before you even get the chance to speak to them.
A bit of planning upfront saves stress, money, and your brand’s reputation.
Standard Shell Scheme Panel Sizes
Not all shell schemes are the same. Depending on the system or organiser, panel sizes can change. However, a common standard in the UK is:
- Width: 950mm
- Height: 2340mm
Some systems may have different measurements, such as 970mm wide or 2400mm high. It’s important to remember:
- Panel width usually excludes the aluminium poles, which are about 30-50mm wide and interrupt the graphics.
- Height may include a small gap at the bottom and top, which is often hidden or overlaps with lighting or fascia boards.
Pro tip:
Always check the exhibitor manual provided by the event organiser. It usually contains exact measurements, templates, and artwork requirements.
Key Graphic Design Considerations
Once you have the correct panel sizes, it’s time to think about the design. This is where mistakes often happen.
1. Continuous design or individual panels?
Some exhibitors use one large image spread across all panels (a continuous graphic), while others treat each panel as a separate visual. Continuous graphics look great but must be perfectly aligned.
Watch out for the vertical poles—they can split important images or text. Try to avoid placing critical content where the joins are.
2. Keep key content in the safe zone
Make sure logos, text, and important images are placed at least 20mm inside the edge of each panel. This prevents them from being cut off during printing or installation.
3. Visual hierarchy matters
Your main message should be big, bold, and easy to read from a distance. Secondary messages and product images can be lower down or smaller.
4. Design with accessories in mind
If you’re using TV screens, tables, or leaflet stands, make sure they don’t block key parts of your graphics. Plan where everything will go on the day.
5. Less is more
Avoid cluttering your graphics. A clean, focused message will grab more attention than a wall full of text and images.
Print-Ready Artwork Tips
Creating artwork that looks great on screen is one thing. Ensuring it prints perfectly on large panels is another.
Here’s what you need to know:
- File format: Print-ready PDF
- Resolution: 300 DPI (dots per inch)
- Colour mode: CMYK (not RGB)
- Bleed: Usually 3–5mm on each side
- Crop marks: Include them if requested by your print supplier
- Fonts: Outline or embed fonts in the PDF to avoid missing text
Also, name your files clearly (e.g., “Panel_Left”, “Panel_Middle”, “Panel_Right”) so they can be installed in the correct order.
Pro Advice: Getting It Right from the Start
If this is your first time working with shell scheme graphics, don’t worry. Many companies face the same challenges. Here are some tips from industry experts to help you get it right from the start:
- Ask for a template
Most event organisers or print companies will provide a panel template with exact dimensions and bleed lines. - Speak to your stand builder or supplier
If you’re not sure about the structure or measurements, ask for clarification early on. - Work with experienced professionals
A designer who understands exhibition layouts can save you a lot of back-and-forth. They’ll know how to align graphics, manage spacing, and set up files correctly. - Do a mock-up
Print a small-scale version or use digital tools to preview how your full stand will look. - Leave time for checking
Don’t leave your artwork submission to the last minute. Give yourself enough time to review proofs and make changes if needed.
Bonus Tips: Maximise Visual Impact
Want to go beyond just “fitting in” at the event? Use these bonus tips to stand out:
- Use bold colours to attract attention
- Add lighting to highlight key visuals or product areas
- Incorporate QR codes to lead visitors to your website or product videos
- Create depth with layered visuals or textured materials
- Think beyond the shell—add curved headers, corner panels, or floor graphics (if allowed)
And if your budget allows, consider upgrading to bespoke exhibition stands for even more creative freedom and a truly custom look.
Conclusion
Getting your shell scheme graphics right starts with knowing your exact panel sizes and designing with care. Misaligned graphics or last-minute reprints can be costly, not just financially, but in lost exposure. With proper planning and expert help, you can create an exhibition stand that looks professional and draws attention. If you’re gearing up for a trade show and want your graphics to fit perfectly and impress, Sign Company London offers expert design and printing services for bespoke exhibition stands and shell scheme panels that truly make your brand shine.


