Selecting the right projector for a space involves more than just choosing the resolution or brightness. One of the most important factors is throw distance – the distance between the projector and the screen. Proper measurement ensures the projected image fills the screen correctly, maintains sharpness, and delivers optimal viewing quality. XTEN-AV provides AV professionals and enthusiasts with tools to calculate throw distance, simulate layouts, and optimize projector placement before purchase. The decision often comes down to Video Wall vs Projector, particularly when evaluating image quality, flexibility, and room design.
Introduction to Throw Distance
Throw distance determines how far a projector must be from the screen to achieve a desired image size. Selecting a projector without considering throw distance can lead to issues such as:
-
Images that are too small or too large for the space
-
Blurry or out-of-focus visuals
-
Uneven brightness and reduced clarity
-
Keystone distortion or misaligned images
Measuring throw distance before buying a projector ensures that the device will perform as intended, fits within the room, and meets the viewer’s expectations.
Understanding Throw Ratios
Throw ratio is the key specification that determines the relationship between the projector distance and the image width. It is calculated using the formula:
Throw Ratio = Distance from Projector to Screen ÷ Screen Width
For example, a projector with a throw ratio of 1.5:1 will need 1.5 feet of distance for every foot of screen width. Most projectors provide a throw ratio range, allowing some flexibility in placement.
-
Standard throw projectors: Typically have throw ratios between 1.5:1 and 2.0:1.
-
Short throw projectors: Ratios between 0.4:1 and 1.0:1, allowing large images from shorter distances.
-
Ultra-short throw projectors: Ratios below 0.4:1, ideal for very small rooms or interactive setups.
Understanding the throw ratio helps determine whether the projector will fit within the intended space while producing the desired image size.
Steps to Measure Throw Distance Before Buying
-
Determine Screen Size
-
Measure the width and height of the intended screen area.
-
Consider the aspect ratio (16:9, 4:3, or 21:9) for accurate calculations.
-
-
Measure Room Dimensions
-
Measure the distance from the planned projector location to the screen wall.
-
Take into account ceiling height and potential obstacles such as furniture or lighting fixtures.
-
-
Calculate Throw Distance
-
Multiply the screen width by the projector’s throw ratio to find the ideal distance.
-
Use the minimum and maximum values if the projector has a range.
-
-
Check for Obstructions
-
Ensure there are no objects that will block the light path.
-
Verify that mounting options allow proper height and angle for the projector.
-
-
Adjust for Ambient Light
-
Brighter rooms may require the projector to be closer or have higher lumen output.
-
Darker rooms allow greater flexibility in distance.
-
-
Consider Lens Shift and Keystone Correction
-
Lens shift allows vertical or horizontal adjustments without degrading image quality.
-
Keystone correction corrects minor angle issues but can slightly reduce sharpness.
-
Tools to Simplify Measurement
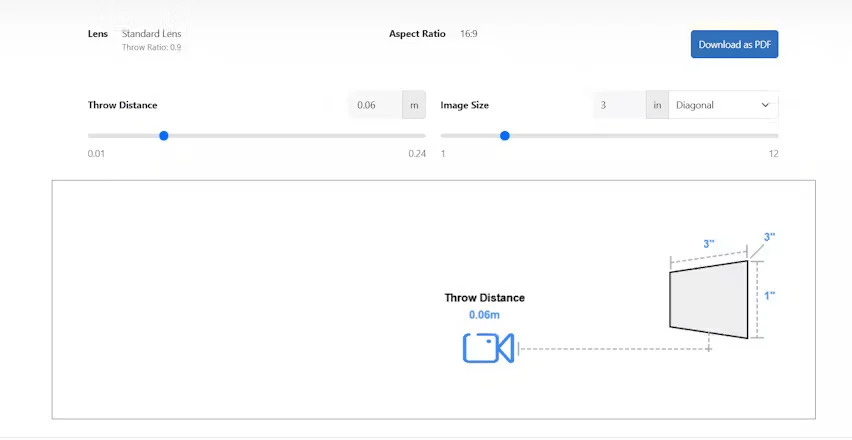
XTEN-AV provides digital tools that simplify throw distance calculations. Users can input room dimensions, screen size, and projector specifications to simulate the projected image in real-time. This helps determine whether the projector will fit the space and deliver the desired viewing experience.
Short Throw vs Standard Throw Considerations
-
Short throw projectors: Perfect for small rooms or spaces where viewers may obstruct the projection path. They allow large images from short distances, making installation flexible.
-
Standard throw projectors: Ideal for dedicated home theaters or larger rooms where distance is sufficient. These projectors provide consistent brightness and image quality over longer distances.
-
Ultra-short throw projectors: Best for compact spaces, interactive displays, or situations where wall space is limited.
Comparing Video Wall vs Projector in Pre-Planning
While projectors require careful throw distance measurement, LED video walls eliminate this need. Video walls provide a fixed, self-illuminating display that does not rely on distance or projection angles. Consider the following:
-
LED walls: Offer consistent brightness and resolution, are ideal for permanent installations, and do not require throw distance calculations.
-
Projectors: Offer flexibility, large images, and cost-effective setups but require accurate placement for optimal performance.
Understanding the advantages of each display type helps in deciding whether a projector or LED wall better suits a particular environment.
Common Mistakes to Avoid
-
Ignoring room layout: Always account for furniture, walkways, and audience seating.
-
Overlooking ambient light: Bright rooms require higher lumens or closer placement.
-
Assuming one-size-fits-all: Different projectors have different throw ratios, so always check specifications.
-
Skipping simulations: Visualizing the setup in advance prevents costly installation mistakes.
Conclusion
Measuring projector throw distance before buying is essential for ensuring the best picture quality, correct image size, and immersive viewing experience. Factors such as screen size, room dimensions, throw ratio, ambient light, and mounting options must all be considered. While Video Wall vs Projector decisions involve evaluating long-term performance and aesthetics, projectors remain an adaptable solution for home theaters, classrooms, and event spaces when placed correctly.
XTEN-AV provides AV professionals and enthusiasts with tools to calculate, simulate, and optimize projector placement. By measuring throw distance accurately before purchase, you can avoid installation errors, maximize image quality, and enjoy a fully immersive viewing experience.
Read more: https://geniusvision.world/whats-the-best-projector-distance-for-a-4k-home-theater-setup/